This post may contain affiliate links. As an Amazon Associate we earn from qualifying purchases.
You may be wondering how long do lath and plaster ceilings actually last? Whether you’re thinking of re-keying your ceiling or repairing a piece of plaster that has come loose, you’ve come to the right place. This article will show you the different steps involved, including how to properly remove loose plaster and rekey your lath and plaster ceiling. It also gives you a basic overview of how long lath and plaster ceilings will last.
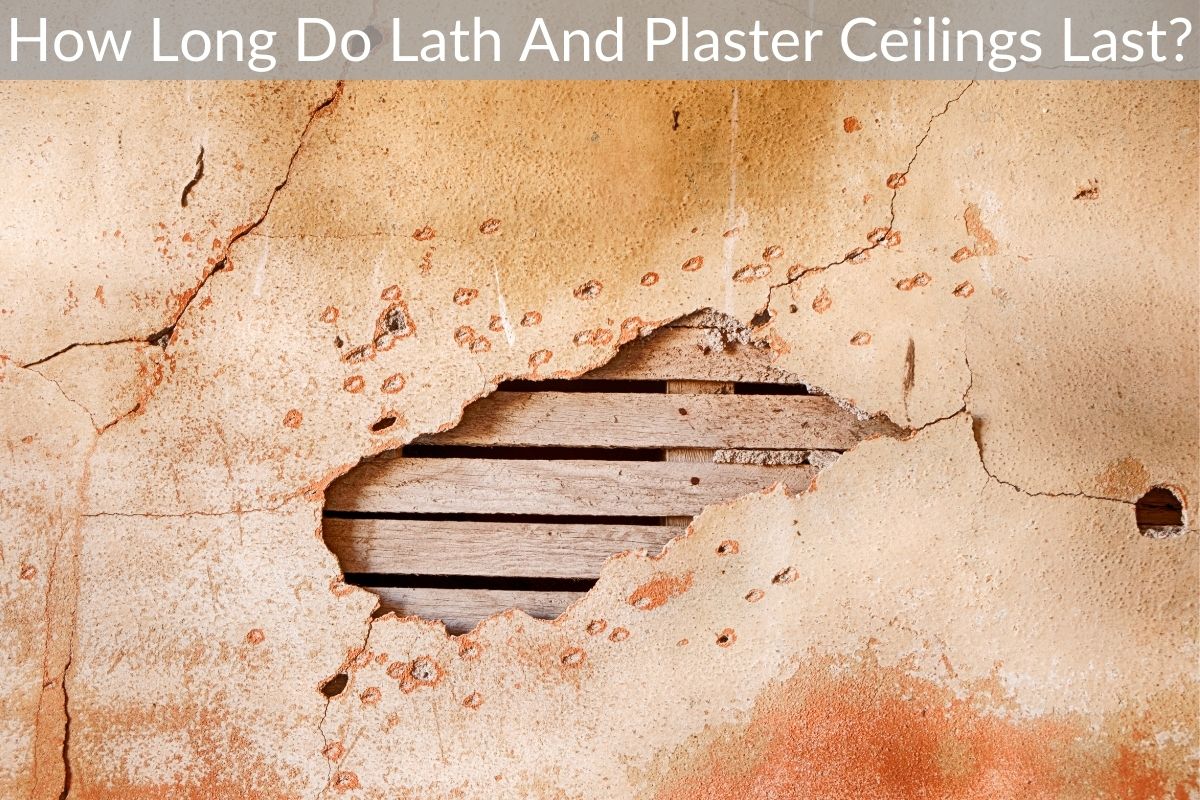
Repairing loose plaster in lath and plaster ceilings
In most cases, repairing loose, cracked, or damaged plaster on a lath-and-plaster ceiling is easy, and requires only minimal skills. Before beginning the repair, make sure that the plaster has been firmly anchored to the lath. You may use a utility knife or a sharp can opener to widen the crack, and then a medium-bristle brush to scrape away the plaster dust.
After removing all loose plaster, carefully drill holes at three to four-inch intervals along the framing, if necessary. This will allow you to inject new wall compound at 8 to 12-inch intervals across the wall. For very soft ceilings, this method may not be possible, so you should replace the entire ceiling with new drywall. Once you have drilled holes, make sure to place the new wall compound evenly throughout the holes.
You should also make sure to choose the correct materials and techniques to repair a lath and plaster ceiling. A softer lime-based plaster will set in a single hour, and will require less sanding. The softer plaster will also keep dust to a minimum. The other type of plaster is called patching plaster, and it is more abrasive than the original plaster.
The best way to repair a loose plaster ceiling is to first diagnose the cause of the problem. If the ceiling is sagging, it means that the plaster keys have come loose from the lath. This is a serious problem and is best solved by repairing the lath and plaster ceiling. If the plaster layer is sagging, you can use an injectable joint compound, or apply spackle. The plaster should return to its original position with about one-half inch of play. If the crack is large, you may need to apply two coats of spackle. Ensure that you only drill through the layer and not through the lath.
If the plasterwork has separated from the laths and has shifted upwards, it may be time to repair the laths and replace the substrate. However, this is a time-consuming and expensive task. If you are not experienced with these types of repairs, you may end up with bigger problems than you anticipated. Moreover, it may be easier to hire a professional to perform the repair.
Re-keying lath and plaster ceilings
Re-keying lath and plaster ceiling has many advantages and disadvantages. While plaster and lath construction has become outdated and less common today, it still has a huge legacy in the UK. Specialist heritage architects will tell you that this method has many benefits. For example, it is quicker and less expensive than drywall. It also provides a perfectly flat surface and clean, straight lines.
To re-key lath and plaster ceilings, you must start by scraping off the loose plaster and replacing it with new plaster. Remove any loose keys and debris from the area. Replace missing plasterboards with new ones. Make sure to use strong adhesives and a wire mesh to reinforce the existing lath. Depending on the size and type of plasterwork, re-keying will require several sessions.
Re-keying plaster ceilings is another way to add years to the life of your ceiling. Unlike traditional methods of plaster consolidation, this method is non-destructive and does not destroy the ceiling. The process requires drilling four to five-millimeter holes and injecting tube-type adhesive. The repair is then supported until the adhesive dries. You can also use a system known as Big Wallys Plaster Magic to re-key plaster ceilings. The Big Wallys Plaster Magic system explains the process and uses four-millimeter holes. Using drywall screws to fix cracks is another option. If this method is not feasible, you can use a blanket-covered timber to wedge it up to the ceiling.
Another method for re-keying lath and plaster ceilings is to use lining paper. This will improve the overall look of the ceiling and will provide a more uniform finish. You can also decorate it using different styles of lining paper. Many of these are painted in a distressed way so that they look aged and damaged. These techniques can add years to the life of a reasonable plaster ceiling.
Aside from re-keying the old lath and plaster ceilings, you can also restore the original lath and plaster wall by installing metal buttons. These will preserve the original plaster wall and ceiling and will be greener and more energy-efficient. Also, they will allow sound to escape while maintaining their historic character. If you can afford it, re-keying your lath and plaster ceilings is an affordable and easy way to add years to the lifespan of your ceilings.
Lifespan of lath and plaster ceilings
Despite its rigid nature, plaster is not indestructible. It will eventually crack, particularly at the weak points where it is glued to laths. Water ingress and vibration will also lead to cracks. When this happens, sections of the plaster will fall away, while large chunks may also break off. Ultimately, the ceiling will need to be replaced. This article will discuss some of the common reasons for ceilings to fail.
The first way to determine if the ceiling has cracked or is sagging is to look at it from above. You need a sturdy ladder with a safe height, so you can almost touch the ceiling. Once you are up on the ladder, slowly run your hands across the ceiling. Look for cracks, uneven points, or sagging plaster. Repeat the process in other parts of the room, if possible.
To determine if your lath and plaster ceilings are damaged or need to be repaired, look for any visible signs of wear. If possible, hire a specialist craftsman to make the repairs. This will ensure the highest quality and reduce the risk of injury. Not only will this save you money, it will also prevent you from having to tear down the ceiling. You’ll be glad you did! It’s also a lot safer than installing drywall.
Despite the obvious drawbacks of lath and plaster ceilings, these homes have survived for centuries, and if properly taken care of, they’ll last you for many decades. By following the instructions above, you can extend the life of your lath and plaster ceilings. If you don’t take care of them properly, they may not last as long as you would hope, so it’s important to protect them.
Replastering a lath and plaster ceiling is a relatively simple task. It’s easier to repair the ceiling than walls, and the laths can be replaced or repaired with a reed mat that is secured to the bottom joists. You’ll need to prepare a first coat of plaster with one part lime to three parts sharp sand and plenty of animal hair (called haired coarse stuff). A second layer of plaster will be applied over the first coat, and the final coat will be the setting coat.
Maintenance of lath and plaster ceilings
In the case of small holes or cracks in lath and plaster ceilings, the most basic repair technique is to re-key the uncovered plaster. A skilled conservator will use plaster washers and flat-head wood screws to secure the loose plaster to the lath. Next, the patching compound is applied over the underlying plaster to ensure that the new plaster adheres properly. Plasterers do not recommend patching with a single coat of plaster, as this will create a concave surface.
If the damaged ceiling is within a listed building, it is essential to seek advice from a conservation officer. If the ceiling is in a listed building, lime or gypsum plaster should be used. The age and form of modelling will influence the type of plaster to use. Gypsum plaster is suitable for restoring older lath and plaster ceilings, as it hardens quickly. Lime plaster, on the other hand, can be brittle and will not allow sharp details in sculptural decoration.
The lining paper is an alternative option for lath and plaster ceilings. It provides a uniform finish and can be decorated. Some lining papers are painted to look aged and distressed. Moreover, the lining paper can be repainted when needed, which preserves the period feel of the room. Moreover, it may add years to the lifespan of a reasonable plasterwork. And, if it can be repaired, there is no need to replace it.
Old laths must be thoroughly soaked before plastering. If not, it will warp, buckle, or fail to set. In such cases, a new metal lath can be installed over the old wood lath and act as a base for plaster. The new lath should be sprayed and a vapor barrier should be installed behind it. However, the old lath should still be soaked to avoid cracks.
Despite the fact that most plasters are strong, they can develop cracks and tears over time. In extreme cases, the plaster could even separate from the lath due to structural movement in the wood framing. If left unchecked, the resulting cracks and gaps in lath and plaster can damage the ceiling’s appearance and can lead to serious injuries. To avoid these problems, regular inspections are essential.